
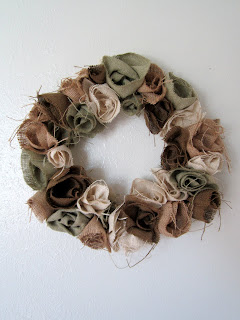


At church, the women have a once-a-year craft day called "Super Saturday." We have great crafting, gift, and home decor projects to complete together. I got to come up with a few easy and cheap ideas, and this cute wreath is one of them. I love the messy, charming look the loose, burlap rosettes give these wreaths, and I'm especially diggin' the fact that they only cost about $5 to make.
The neutral one above is my favorite, and will be perfect to hang for fall, once I find the right bow. I love how organic it looks-- my new favorite decor item!
You'll need:
** Cardboard-- I just used an old box
** Knit fabric, cut into long, 3 inch strips (This can be an old t-shirt or new fabric)
** A glue gun and LOTS of glue. (I went through a whole bag of sticks)
** 1-2 yards of burlap, cut into 2-3 inch long strips, in the color(s) you choose. I got mine at Joanns for 3.99/ yd. They have several colors including off-white, tan, brown, sage, black, orange, and red.
 1. Using an exacto razor, cut out two wreath shapes from the cardboard( for my front door, mine were about 18 inches in diameter.)
 2. Hot glue the two pieces of cardboard together, then wrap the knit fabric around the cardboard, gluing to secure as you go around.
 **Here's the finished knit covered cardboard, although in hindsight I would have used the same color knit and burlap.
Now for the rosettes...
 3. Start by folding over the end of the fabric, and gluing to secure.
 4. Add a line of hot glue along the bottom, and start rolling the fabric to form a messy rosette. Pinch the bottom and gather as you go along so it'll get a more flower-y shape. The beauty of these things is that they are messy and unique. Continue gluing and rolling until you like the size, the cut off any remaining burlap and make another. ***Be careful! You don't want to end up burning your fingerprints off like I did!
  Pretty soon you'll have a big pile of cute little rosettes! Start hot gluing them onto the wreath, making sure to put them pretty close together. And remember to add as much hot glue as you need!
And here it is finished! I added a green bow for Christmas, but let's not even think about Christmas yet! It would also be a cute wreath for Valentines or 4th of July-- just change the bow!
These are so cute and I love the colors. Great job and Thanks for sharing.
ReplyDelete