Wednesday, August 24, 2011

So what's the deal with Quinoa (Keen-wah)?


Quinoa is a small, South-American grain that is really growing on me. It kind of looks like tapioca pearls, and has the same mild, nutty flavor as brown rice. If you've heard anything about the grain, you know it's supposedly very good for you.
So what makes it so darn healthy? Besides being a good source of magnesium, iron, phosphorous and copper, this great grain has lots of protein. It is a complete protein (meaning it contains all amino acids,) which makes it a fabulous choice for vegetarians.
What can you do with it? First, give it a good rinse to wash off remains of the bitter husk, then cook like you would rice. I add 1 part Quinoa to 2 parts water, and cook on medium heat, stirring occasionally, for about 30 minutes.
Try it in this super tasty, light salad.

Quinoa & Kale Salad

Mix together:
2 C cooked Quinoa
1 tomato, chopped
3/4 C kale, cut into bite size pieces
3/4 C black beans
1/2 clove garlic, finely minced

1/2-1 T lime juice
Salt & Pepper to taste

I like it both hot and cold. You could also add corn, avacado, or chile pepper for some heat. So delicious and very good for you!


Tuesday, August 23, 2011

Colorblock Maxi Skirt

There's something so feminine, yet comfy and casual about maxi skirts. Plus, I like not having to shave my legs for church. I'm loving the color block trend right now, so I decided to make a nice, medium-weight skirt, perfect for fall weather.

I wanted the skirt to be 36" long, and about 36" circumference. (Does that make sense? So each strip is 18" wide.) I decided which colors to use, and how thick a stripe I wanted of each. The strip lengths for mine were:
Grey=19 1/4"
Green= 6"
White= 2 1/4"
Blue= 7"
Grey= 5"
Decide what length you want, then make sure to add 1" for top seam, 1/2" for bottom seam, and 1/2" for each strip (accounting for seam allowance.)
**Also notice that I angled the top grey fabric in so there was less bulk at the top.
Complete the front and back panels first, sewing together all of the strips.Pin both panels, right sides together. ** Be careful to match up the seams so when the skirt is finished, each color stripe matches up front and back.
Iron the bottom up 1/2" and hem. I went with two lines of stitching for a more finished look, although looking back, I would have used a different color of thread than cream.
Now, iron down the fabric at the top opening, about 1 inch.

Unfold the fabric, and cut a 3/4 opening in the middle of the front. (Where the drawstring will go through.)
Buttonhole stitch the opening.
Refold down fabric where you previously ironed, then sew a casing around the top of the skirt with a 3/4" or 1" seam allowance.
To make the drawstring, cut a long strip of fabric (about 1" by 40", depending on how long you want the string.) Fold it in half and sew lengthwise, then turn right side out. Thread through the casing, then knot the ends.


Ta Da! Finished product. I love the grey and bright colors! And... thanks hubs, for being the cameraman. (He's still learning!)


Tuesday, August 16, 2011

Cute Pigs


These days, this little miss waits by the bathroom sink to be picked up and placed on the counter. She gives me the comb, and gets out two rubber bands (or 50) so she can have pretty hair.

Friday, August 12, 2011

Burlap Rosette Wreath Tutorial


At church, the women have a once-a-year craft day called "Super Saturday." We have great crafting, gift, and home decor projects to complete together. I got to come up with a few easy and cheap ideas, and this cute wreath is one of them. I love the messy, charming look the loose, burlap rosettes give these wreaths, and I'm especially diggin' the fact that they only cost about $5 to make.


The neutral one above is my favorite, and will be perfect to hang for fall, once I find the right bow. I love how organic it looks-- my new favorite decor item!


You'll need:

** Cardboard-- I just used an old box

** Knit fabric, cut into long, 3 inch strips (This can be an old t-shirt or new fabric)

** A glue gun and LOTS of glue. (I went through a whole bag of sticks)

** 1-2 yards of burlap, cut into 2-3 inch long strips, in the color(s) you choose. I got mine at Joanns for 3.99/ yd. They have several colors including off-white, tan, brown, sage, black, orange, and red.


1. Using an exacto razor, cut out two wreath shapes from the cardboard( for my front door, mine were about 18 inches in diameter.)


2. Hot glue the two pieces of cardboard together, then wrap the knit fabric around the cardboard, gluing to secure as you go around.


**Here's the finished knit covered cardboard, although in hindsight I would have used the same color knit and burlap.

Now for the rosettes...


3. Start by folding over the end of the fabric, and gluing to secure.


4. Add a line of hot glue along the bottom, and start rolling the fabric to form a messy rosette. Pinch the bottom and gather as you go along so it'll get a more flower-y shape. The beauty of these things is that they are messy and unique. Continue gluing and rolling until you like the size, the cut off any remaining burlap and make another. ***Be careful! You don't want to end up burning your fingerprints off like I did! 
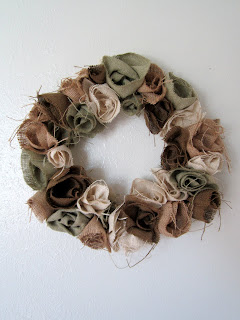
Pretty soon you'll have a big pile of cute little rosettes! Start hot gluing them onto the wreath, making sure to put them pretty close together. And remember to add as much hot glue as you need!


And here it is finished! I added a green bow for Christmas, but let's not even think about Christmas yet! It would also be a cute wreath for Valentines or 4th of July-- just change the bow!

Wednesday, August 10, 2011

Impel Clothing Review


I've tried every modest basic tee under the sun. I've found ones that barely last a season or two before they've faded, and ones that loose their stretch even faster than that. But now... I've found a new, favorite basics (and so much more) company-- Impel Clothing.


I came across Impel a few months ago, and was thoroughly impressed by their customer reviews. Everyone who has tried their product loves it, and says that their basics shirts retain their color, stretch, and quality for a long time. They also sell accessories, cute tops, and great jeans. Don't you love the contrast stitching on these? I am a huge fan of purple, and love this lace long-sleeve top.


I reviewed the Favorite V-Neck Tee in red. I love that their layering tees come in sizes xxs to xxl, and have a bit of spandex in them to retain great shape. This tee hugs me without being too skin tight. I like that it has finished hems and neckline, rather than just being serged. I have washed and worn it several times, and it is just as soft and bright as new! It's perfect for going underneath my favorite maxi dress. (Don't you also love little E, just munching away on goldfish?) It's gonna last many more summers!


See that little ad over to the right? Go check out Impel too! You won't be disappointed!


** Please note that while I did recieve an item from this company for review, I was not paid to do it. All thoughts expressed are my honest and genuine opinion.


Thursday, August 4, 2011

Moments That Matter Most


I've been reading short and sweet self-help messages from Richard Carlson Ph.D., in his book, "Don't Sweat the Small Stuff with Your Family. These little page-long tips are practical, and should be common sense, but they are definitely things to think about.

A few weeks ago I read about "Letting Go of Expectations." I am a planner, and sometimes, I do a little too much thinking about how a certain event or day or encounter should go. It is frustrating and disappointing when things don't go as planned. Sometimes I freak out about little things, like Elsie spilling a drink, or being late for an appointment.

Carlson says letting go of some expectations allows you to open your heart and accept what is. Learning to be calm and roll with punches is a necessary part of life, and will help me be happier. And, just like this little video shows, it will allow me to pay attention to what matters most.

Wednesday, August 3, 2011

A few happy thoughts....

I have more reasons than usual to be a happy girl!

1. Last week, I became a certified Zumba instructor and started teaching classes at my gym. I LOVE the energy and fun that dancing and working out give me. Plus, I love being with those awesome ladies in my class.


2. My anniversary is coming up, and, being the cheap-o that I am, I've been looking for restaurant/ activity deals. I found one for Ben & Jerry's on Morgan's Deals and one for a yummy pizza place on Groupon. If you EVER do anything outside your house, check it out. I love paying 50% underprice!


3. Through pinterest, I have found so many adorable (and FREE) word art printables. Positive words are a necesity in my life. I get a warm fuzzy feeling just looking at these! Thank you talented people of blogland for sharing your creativity! A few of my favorites....Diary of Dave's Wife

The ArielRose Blog


Tuesday, August 2, 2011

Nightstand Re-Do

I'm so excited for two reasons: 1. I got a new camera so I can actually feel proud of the pictures posted on here. 2. I finally get to unveil the adorable revamped nightstand that is going to be in little E.'s room!

I got this little beauty for $2 at the ReStore (it's the Habitat for Humanity's goodwill.) I couldn't pass up something that cheap! It has one drawer and a great space underneath with sliding doors, perfect for some small toy or book baskets.


So this process was a little longer than it needed to be. First I spraypainted the whole thing yellow...and decided I didn't want it that color right as I finished. So...we went with a teal-y blue. I just randomly picked it because the "ocean breeze" name spoke to me at Lowes. I found a small diamond pattern stencil at Michaels for $3 that I used on the drawer. I placed the first one in a good spot, then just eyeballed it as I kept painting more diamonds, trying to make an even pattern. P.S.-- The stencil was fun and I love the finished look, but it definitely didn't come out perfect. I think I've got the hang of it now, but just don't look to closely at the finished drawer.


After that I just sanded around the edges, and a little yellow showing through looks pretty cute. I also bought new brass knobs ( I think they were 1.15 each from Lowes). ***This little table has helped me decide to do Elsie's room teal, deep purple, and mustard yellow. That means plenty more pictures to come!


Well... what do you think?! I love seeing a project come together.

** I love this adorable print, from HERE. Maybe the quote is too deep for a child's room, but it helps me be a better mother to her.